通过 MQTT 触发
本教程演示如何使用简单的 MQTT 消息远程触发 OV80i 摄像头。只需几个步骤,您就能获得一个可以在网络中的任意位置捕捉和处理图像的系统——无需复杂编程!
您将构建的内容: 通过在网络上发送一个简单消息来启动摄像头检查的简单远程触发器。
预计时间: 20-30 分钟
难度等级: 初级
实际示例: 想象在操作员平板上的一个按钮,瞬间触发摄像头对零件进行检查——这正是我们要构建的系统,但使用 MQTT 消息,而不是按钮。
先决条件
开始前,请确保您具备:
- OV80i 摄像头已连接并正常工作
- 已设置好且可使用的配方
- 已配置 MQTT 通信(如需,请参阅 MQTT 通信设置 指南)
在 Imaging Setup 中将相机触发设为 Manual——这表示相机将等待您的远程命令,而不是自动拍摄。
为什么 MQTT 触发很简单
OV80i 使远程触发变得简单:
- 无需编码——只需拖拽并连接几个节点
- 即时工作——发送消息,立即获得结果
- 可靠的消息传递——MQTT 确保命令到达相机
- 任意设备均可触发——平板、计算机、PLC 或传感器
非常适合: 远程检查控制、自动化生产线,或任何需要从其他位置触发相机的场景。
第1步:快速进行摄像头检查
1.1 将摄像头设为手动触发
- 进入 Recipe Editor
- 点击 "Imaging Setup"
- 找到 Trigger Mode 并设为 "Manual"
- 点击 Save
为什么使用 Manual? 这意味着相机会“等待我的命令”而不是自动拍照。
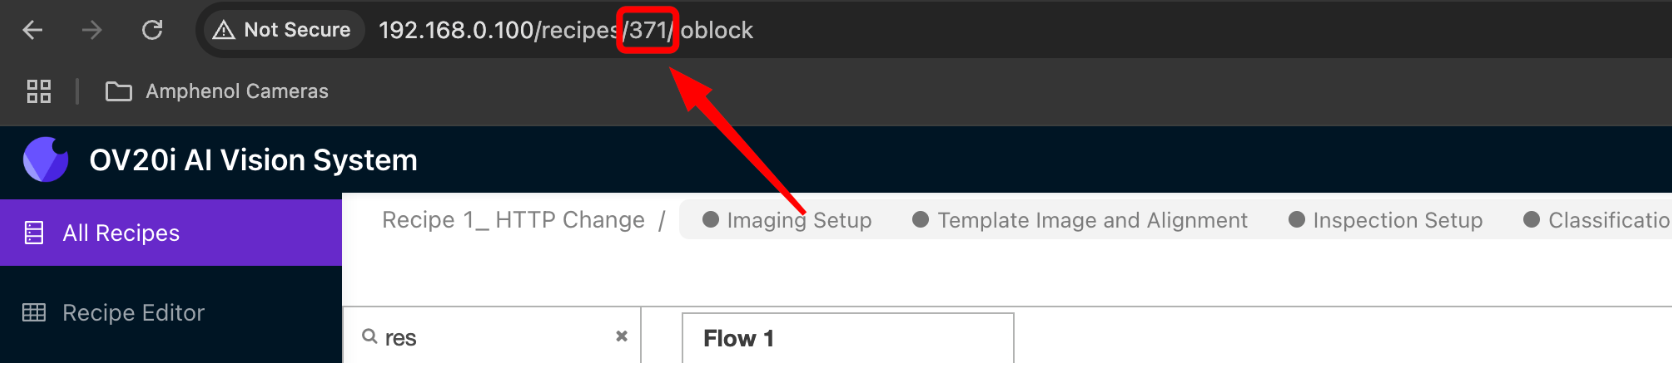
1.2 查找您的配方编号
- 在 Recipe Editor 中查看浏览器地址栏
- 在
/recipe/之后查找数字(例如:如果 URL 显示/recipe/10,您的配方编号是 10) - 把这个数字写下来 —— 稍后会用到
第2步:打开 Flow Builder
2.1 进入 Node-RED
- 在您的 Recipe Editor 中,点击 "Configure IO" 或在面包屑菜单中选择 "IO Block"
2.2 重新开始
如果画布上有其他节点也没关系——我们会把新的触发流并排放在它们旁边。
让我们开始吧!
第3步:MQTT 触发的简单秘诀
你需要了解的一切是:相机远程拍照需要 2 条快速消息。
- 第一条消息: “嘿相机,准备好接受远程命令”
- 第二条消息: “现在拍照!”
3.1 将这 5 个节点拖到画布上
从左侧面板,将它们拖到主区域:
- Inject(来自 Input 区)—— 这将是您的“触发按钮”
- Change(来自 Function 区)—— 用于消息 1
- Delay(来自 Function 区)—— 两条消息之间的微小暂停
- Change(来自 Function 区)—— 用于消息 2
- MQTT Out(来自 Network 区)—— 向摄像头发送消息

Step 4: Configure Your Nodes
4.1 Set Up Your Trigger Button
- Double-click the Inject node
- Change the name to "Remote Trigger"
- Click "Done"
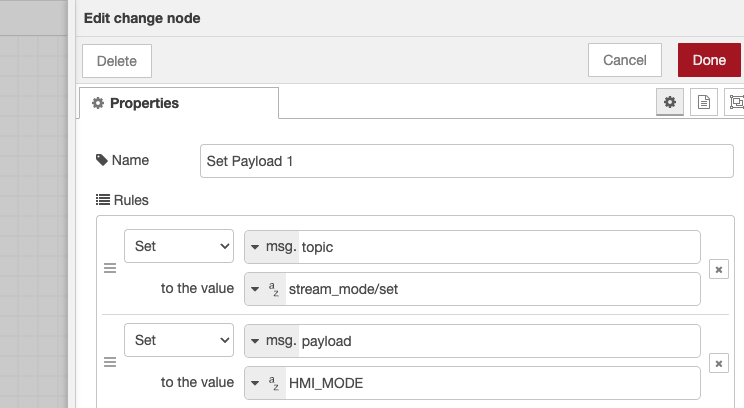
4.2 Set Up Message 1 (Get Ready Command)
- Double-click the first Change node
- Change name to "Get Ready"
- Click "Add" and select "SET"
- Set
msg.topictostream_mode/set - Click "Add" again and select "SET"
- Set
msg.payloadtoHMI_MODE - Click "Done"
作用: 告诉相机 "get ready for a remote command."
4.3 Add a Small Delay
- Double-click the Delay node
- Set delay to 10 milliseconds
- Click "Done"
原因: 只是让相机有一个短暂的准备时间。
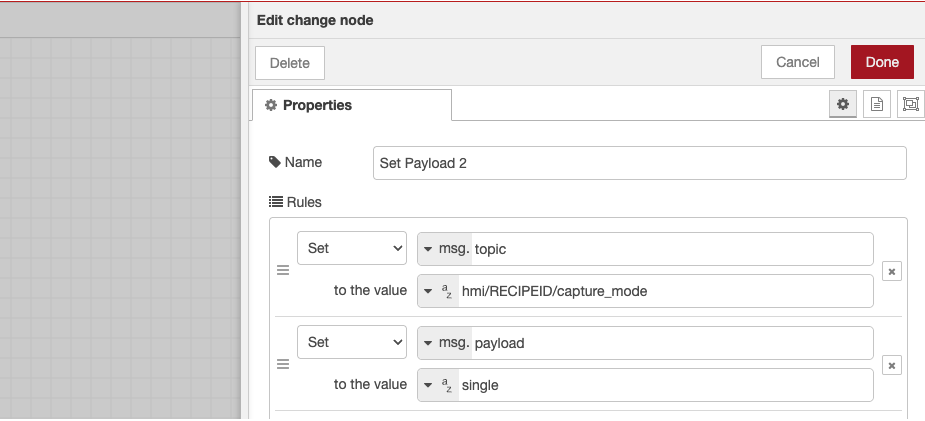
4.4 Set Up Message 2 (Take Picture Command)
- Double-click the second Change node
- Change name to "Take Picture"
- Click "Add" and select "SET"
- Set
msg.topictohmi/[YOUR_RECIPE_NUMBER]/capture_mode - Replace [YOUR_RECIPE_NUMBER] with your actual number (like
hmi/10/capture_mode) - Click "Add" again and select "SET"
- Set
msg.payloadtosingle - Click "Done"
作用: 告诉相机 "take one picture now!"
4.5 Set Up the Message Sender
- Double-click the MQTT Out node
- Select your MQTT broker (should already be configured)
- Change name to "Send to Camera"
- Click "Done"
Step 5: Connect Everything Together
This is the fun part! Now we connect your nodes to create the flow.
5.1 Make the Connections
Draw wires between nodes like this:
- Remote Trigger → Get Ready → Send to Camera
- Remote Trigger → Delay → Take Picture → Send to Camera
视觉指南:
Remote Trigger ──→ Get Ready ──→ Send to Camera
      │
      └──→ Delay ──→ Take Picture ──→ Send to Camera
5.2 How to Connect Nodes
- Click and drag from the little square on the right side of a node
- Drop the wire onto the left side of the next node
- You'll see a gray line connecting them
Step 6: Test Your Remote Trigger
6.1 Activate Your Flow
- Click the red "Deploy" button in the top-right corner
- You should see "Successfully deployed" message
6.2 Try It Out
- Place a part in front of your camera (for testing)
- Click the button on your "Remote Trigger" node
- Watch your camera take a picture!
成功迹象:
- Camera LED flashes briefly
- You hear the inspection processing
- New image appears in your Library
6.3 Check Your Results
Go to your Library page - you should see a new image with a recent timestamp. Click on it to see the inspection results!
If it worked: Congratulations! You just remotely triggered your camera.
If not: Check the troubleshooting section below.
Step 7: Use It from Other Devices (Optional)
Want to trigger from your phone, tablet, or another computer? Here's how:
7.1 From Any MQTT App
Download any MQTT app and connect to your camera's IP address on port 1883, then:
- Send first message:
- Topic:
stream_mode/set - Message:
HMI_MODE
- Topic:
- Wait a moment, then send second message:
- Topic:
hmi/[YOUR_RECIPE_NUMBER]/capture_mode - Message:
single
- Topic:
7.2 从命令行
On Windows/Mac/Linux:
# First message
mosquitto_pub -h [CAMERA_IP] -t "stream_mode/set" -m "HMI_MODE"

# Second message (replace 10 with your recipe number)
mosquitto_pub -h [CAMERA_IP] -t "hmi/10/capture_mode" -m "single"
That's it! 您的相机将能够从网络中的任意位置拍摄图片。
Step 8: 验证与测试
8.1 端到端测试
完整工作流验证:
| Test(测试) | Action(操作) | Expected Result(预期结果) | Status(状态) |
|---|---|---|---|
| Manual trigger | 点击注入按钮 | 图像已捕获并处理 | ☐ |
| HMI mode activation | 检查相机状态 | 相机切换到 HMI 模式 | ☐ |
| Inspection execution | 验证处理 | 调试输出显示检测结果 | ☐ |
| External trigger | 发送 MQTT 命令 | 远程触发工作 | ☐ |
8.2 性能验证
监控以下指标:
- 触发响应时间: 从 MQTT 消息到图像捕获
- 处理时长: 完成检测所需时间
- 结果传递: 调试输出时序
- 系统可靠性: 在多次测试中保持一致的触发
8.3 生产就绪
在投入生产前:
- 使用实际零件 和检验条件进行测试
- 验证与外部系统的集成
- 确认 MQTT 通信的网络可靠性
- 记录触发主题 和消息格式
Step 9: 快速故障排除
无法工作?以下是最常见的解决方法:
9.1 相机不拍照
| Problem(问题) | Quick Fix(快速解决办法) |
|---|---|
| 点击触发按钮时没有任何反应 | 检查在“Take Picture”节点中的配方编号是否正确 |
| 相机拍照但没有进行检测 | 确保你的配方处于激活状态并具备经过训练的模型 |
| 触发有时有效 | 在 Imaging Setup 中验证触发是否设置为 Manual |
9.2 MQTT 问题
| Problem(问题) | Quick Fix(快速解决办法) |
|---|---|
| MQTT 节点上的红点 | 检查设置中的 MQTT broker 连接 |
| 部署按钮呈灰色,无法使用 | 先在画布上任意点击,然后再尝试部署 |
| 节点无法连接 | 确保您从右侧的小方块拖动连线 |
仍然卡住? 请再次确认 MQTT 通信设置正确(请参阅 MQTT 通信设置 指南)。
做到了! 🎉
恭喜! 您现在可以远程控制 OV80i 相机。仅需几次点击,您就构建了一个可以:
- 在网络上的任意位置触发检测
- 与手机、平板、电脑等设备协作——任何能够发送 MQTT 消息的设备
- 与其他系统集成,如 PLC、传感器或自定义应用
- 通过使用不同的配方编号扩展到多摄像头
下一步?
现在基础功能已就绪,您可以:
简易后续步骤
- 使用 MQTT 应用在不同设备上测试
- 为不同的配方创建多个触发点
- 将其加入您的生产工作流程
高级思路
- 连接到 PLCs,用于自动化生产线
- 构建自定义应用程序,可触发多台摄像头
- 添加结果转发,将检验数据发送到其他位置
- 创建操作员仪表板,并带有触发按钮
现实世界案例
以下是其他人如何使用 MQTT 触发:
- 质控站(Quality Control Stations):操作员扫描条码,系统触发摄像头检测
- 传送线(Conveyor Lines):传感器检测到零件后,自动触发检验
- 人工检验(Manual Inspection):操作员使用带有简单“Inspect”按钮的平板
- 生产监控(Production Monitoring):中央系统协调多台摄像头
可能性是无穷无尽的——一切都始于你刚刚构建的简单系统!